
Internal · Staff training
Staff training
Watch the clip, play the narration, read the notes. One module per part of the booking app.
Screens are captured against the live app. The customer shown in every clip is test data.
Module 01
Booking flow
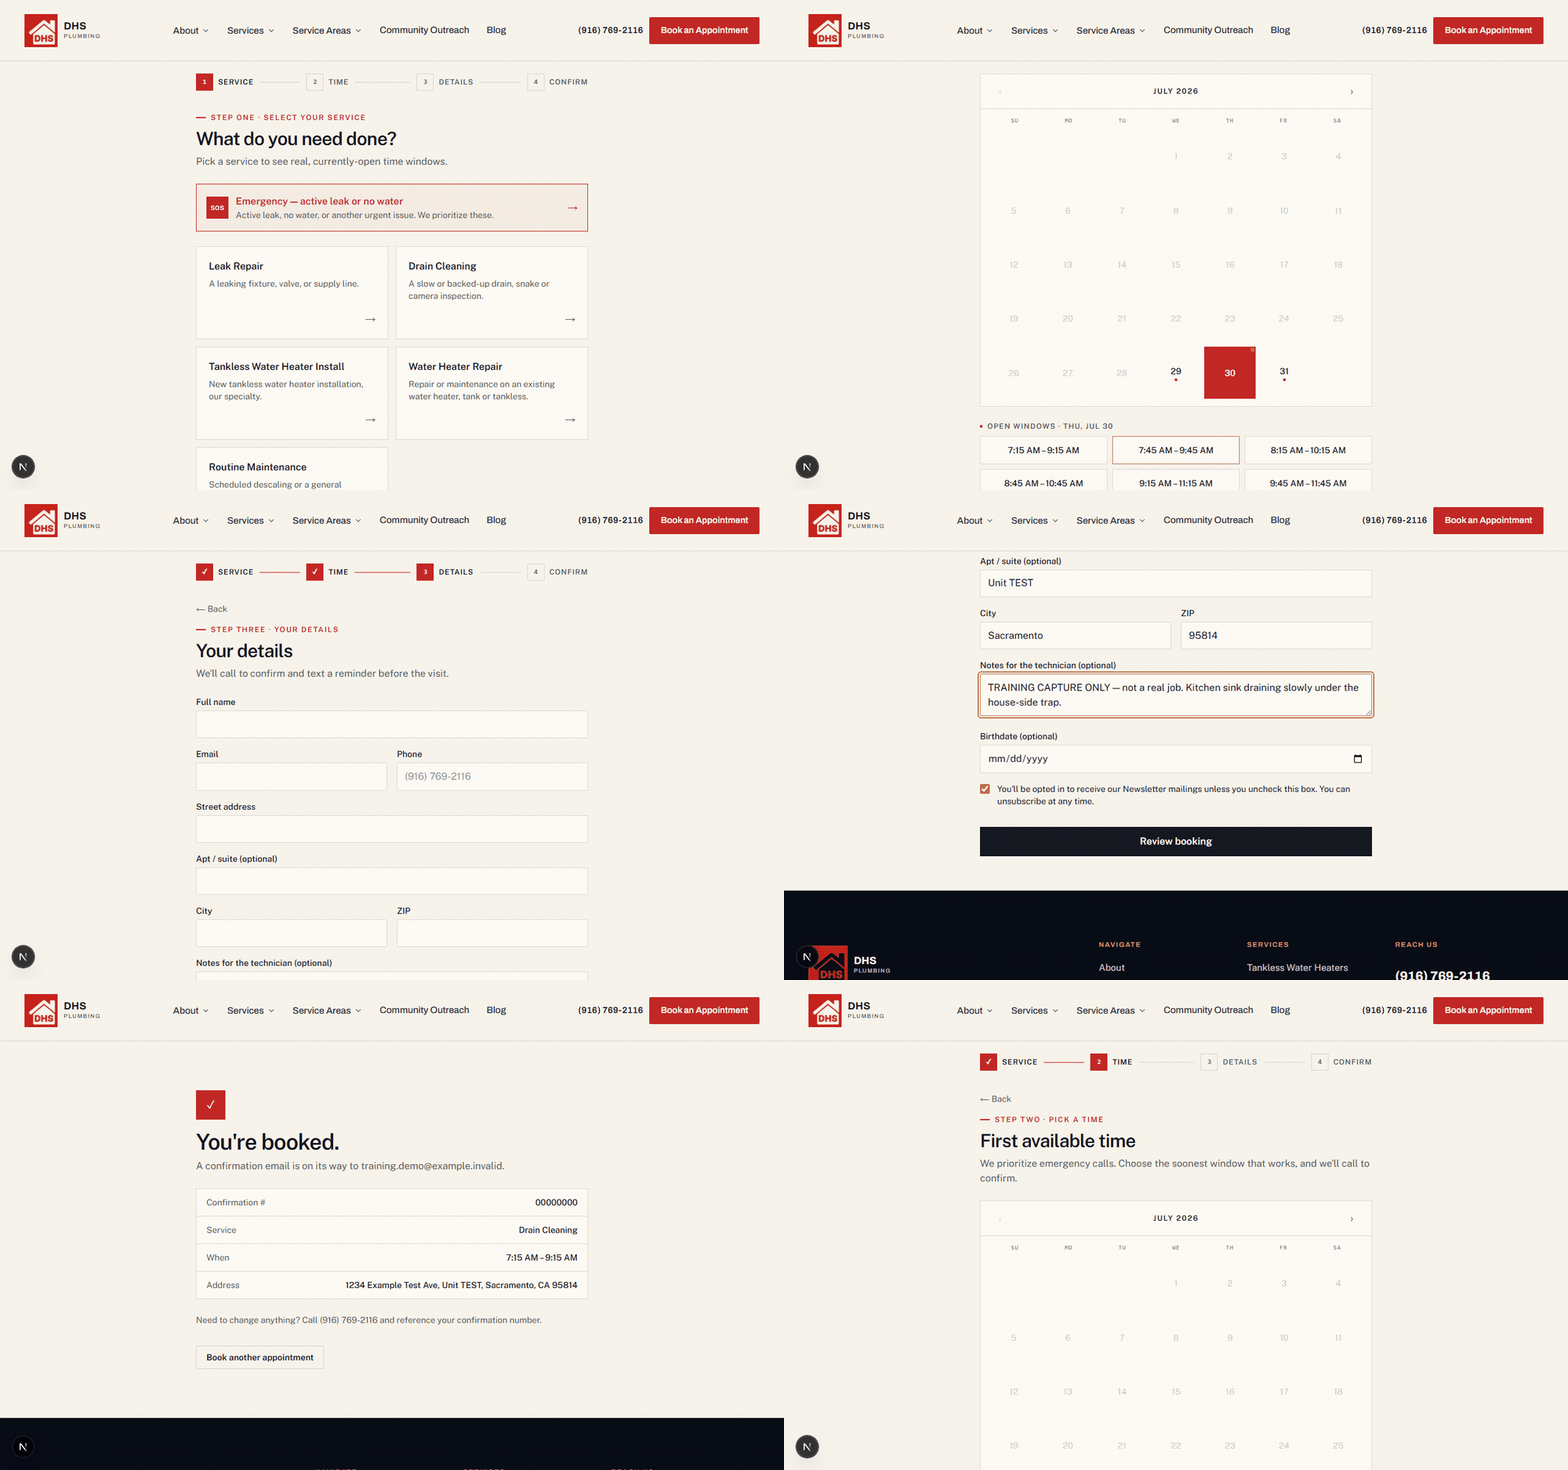
The public booking page at /book. No login, no account: anyone with the link
can use it. Four steps: Service, Time, Details, Confirm.
Narration
Step notes
-
Step one
Pick a service
The red Emergency bar at the top is for an active leak or no water. Everything below it is routine work: leak repair, drain cleaning, tankless install, water heater repair, routine maintenance.
The service picked sets how long the appointment is and how much buffer time gets blocked around it, so it changes which times show up on the next screen.
-
Step two
Pick a day
The calendar only lights up days that actually have open windows in the next 14 days. Grey days have nothing available; a small red dot marks a day with openings.
This reads off the live schedule. If a window shows here, it's genuinely open.
-
Step two
Pick a window
Clicking a day lists that day's open windows underneath. Each one is the arrival block: two hours for drain cleaning, longer or shorter for other services.
Clicking a window turns it dark. Continue stays disabled until one is selected.
-
Step three
Customer details
Required: name, email, phone, street address, city, ZIP. Review booking stays greyed out until all six are filled in. Apt/suite, notes, and birthdate are optional.
The notes field is what the technician reads before the visit. If you're entering a booking for someone who called in, put the real problem description there.
-
The newsletter checkbox
Checked by default. If a customer doesn't want mailings, they have to uncheck it, or you uncheck it for them.
-
Step four
Review & confirm
The last screen before anything is saved. It lists back the service, time window, address, contact, and notes.
If something's wrong, use the ← Back link at the top. The wizard keeps everything already typed.
-
What "Confirm booking" actually does
Writes the appointment, holds that time slot so nobody else can take it, emails the customer, emails the office, and texts the customer if they opted into texts.
-
The confirmation screen
Shows a confirmation number: the first eight characters of the booking ID. That's the number to ask for on the phone when someone wants to change or cancel. The customer gets the same number in their confirmation email.
-
If two people book the same window
The second person gets sent back to the time step with a message that the slot was taken. That's the system preventing a double booking; nothing is broken, they just pick another window.
-
The emergency path
It doesn't skip any steps: same four screens. What it does is flag the job as urgent for the office and tell the customer we'll call to confirm the window.
Module 02
Estimating
The estimates list and detail pages at /admin/estimates. Build a quote, track its
status, and move it toward a contract or invoice.
Narration
Step notes
-
Step one
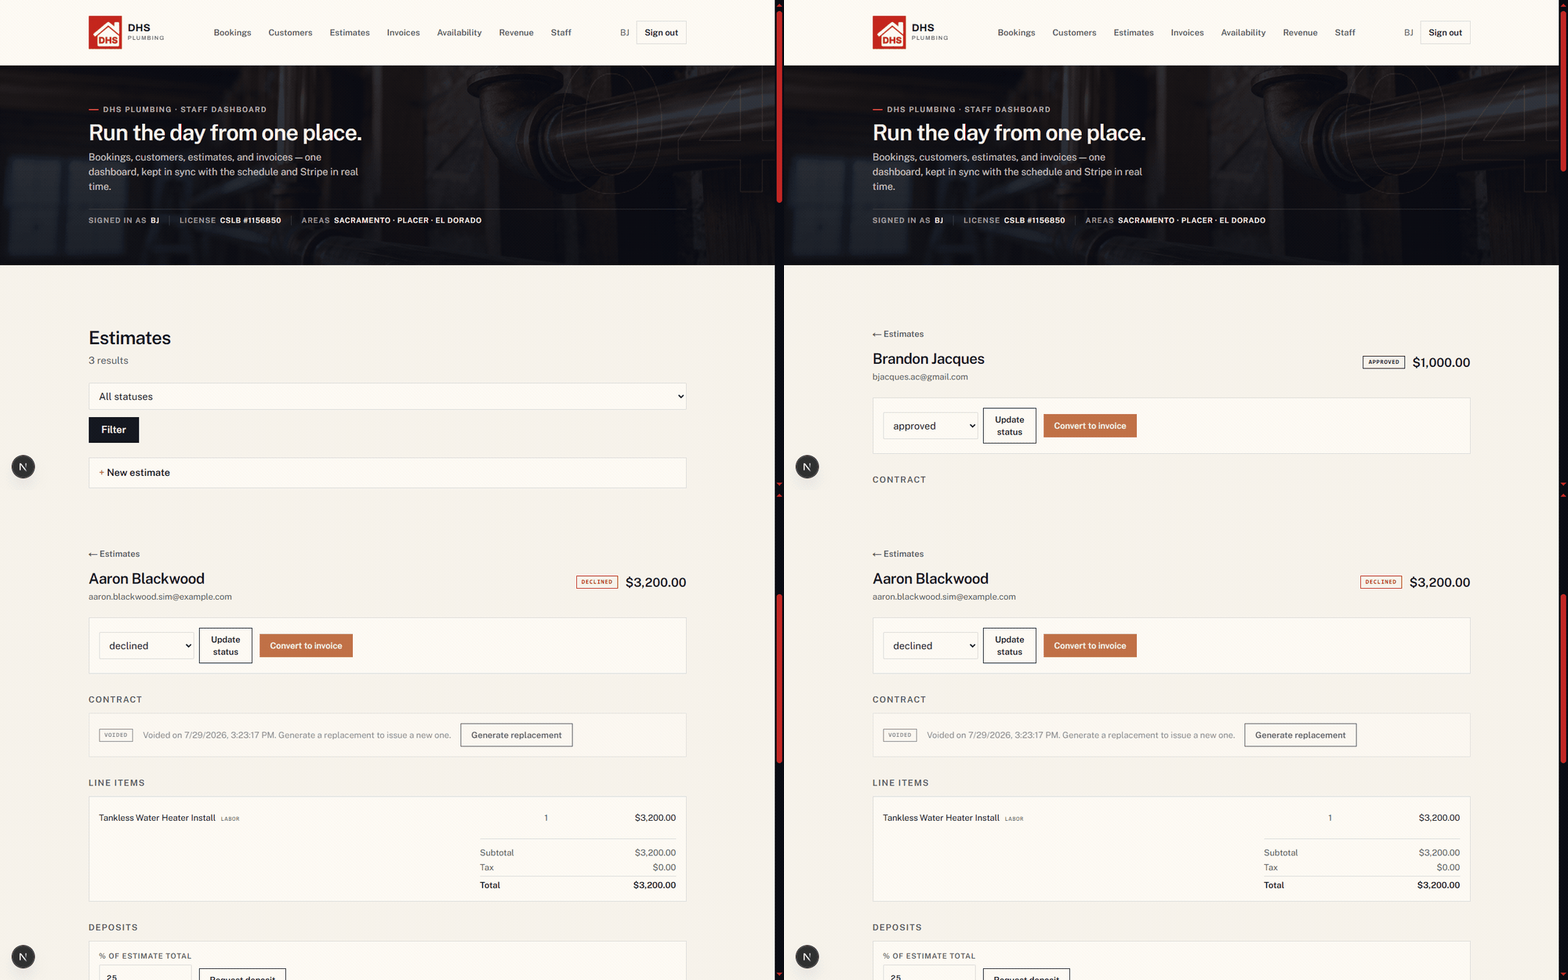
The estimates list
Everything lives at
/admin/estimates. Each row shows the customer, the status, the date, and the total.The filter at the top narrows the list down to one status at a time.
-
The five statuses
Draft, sent, approved, declined, and expired. An estimate moves between them from the status dropdown on the estimate itself, not from the list.
-
Step two
Create an estimate
A short form. Pick the customer from the dropdown, optionally link it to an existing booking, then add one or more line items.
Each line carries a service type, a line type of labor, parts, fee, discount, or trip charge, a quantity, and a unit price. The total updates as lines go in. Create estimate saves it.
-
Step three
Open an estimate
Four things, stacked down the page. At the top, the customer and the total, with a dropdown to move the status through draft, sent, approved, declined, or expired, and an Update status button.
Below that, Convert to invoice, for once the customer has said yes. Below that, the contract section, which is the next module. Below that, the line items with subtotal, tax, and total.
-
Deposits
At the bottom of the page. Request a deposit as a flat dollar amount or as a percent of the estimate total.
This is separate from the down payment built into a signed contract. Use it when you want money up front before a contract exists at all.
-
One contract per estimate
Generating a second one is blocked. If an estimate already has a contract on it, you have to void the old one first. The contract state shown here always reflects the one real record for that estimate.
Module 03
Contracts
The contract lifecycle, generated from an estimate: draft, send, customer sign, and the frozen signed record.
Narration
Step notes
-
Step one
Every contract starts from an estimate
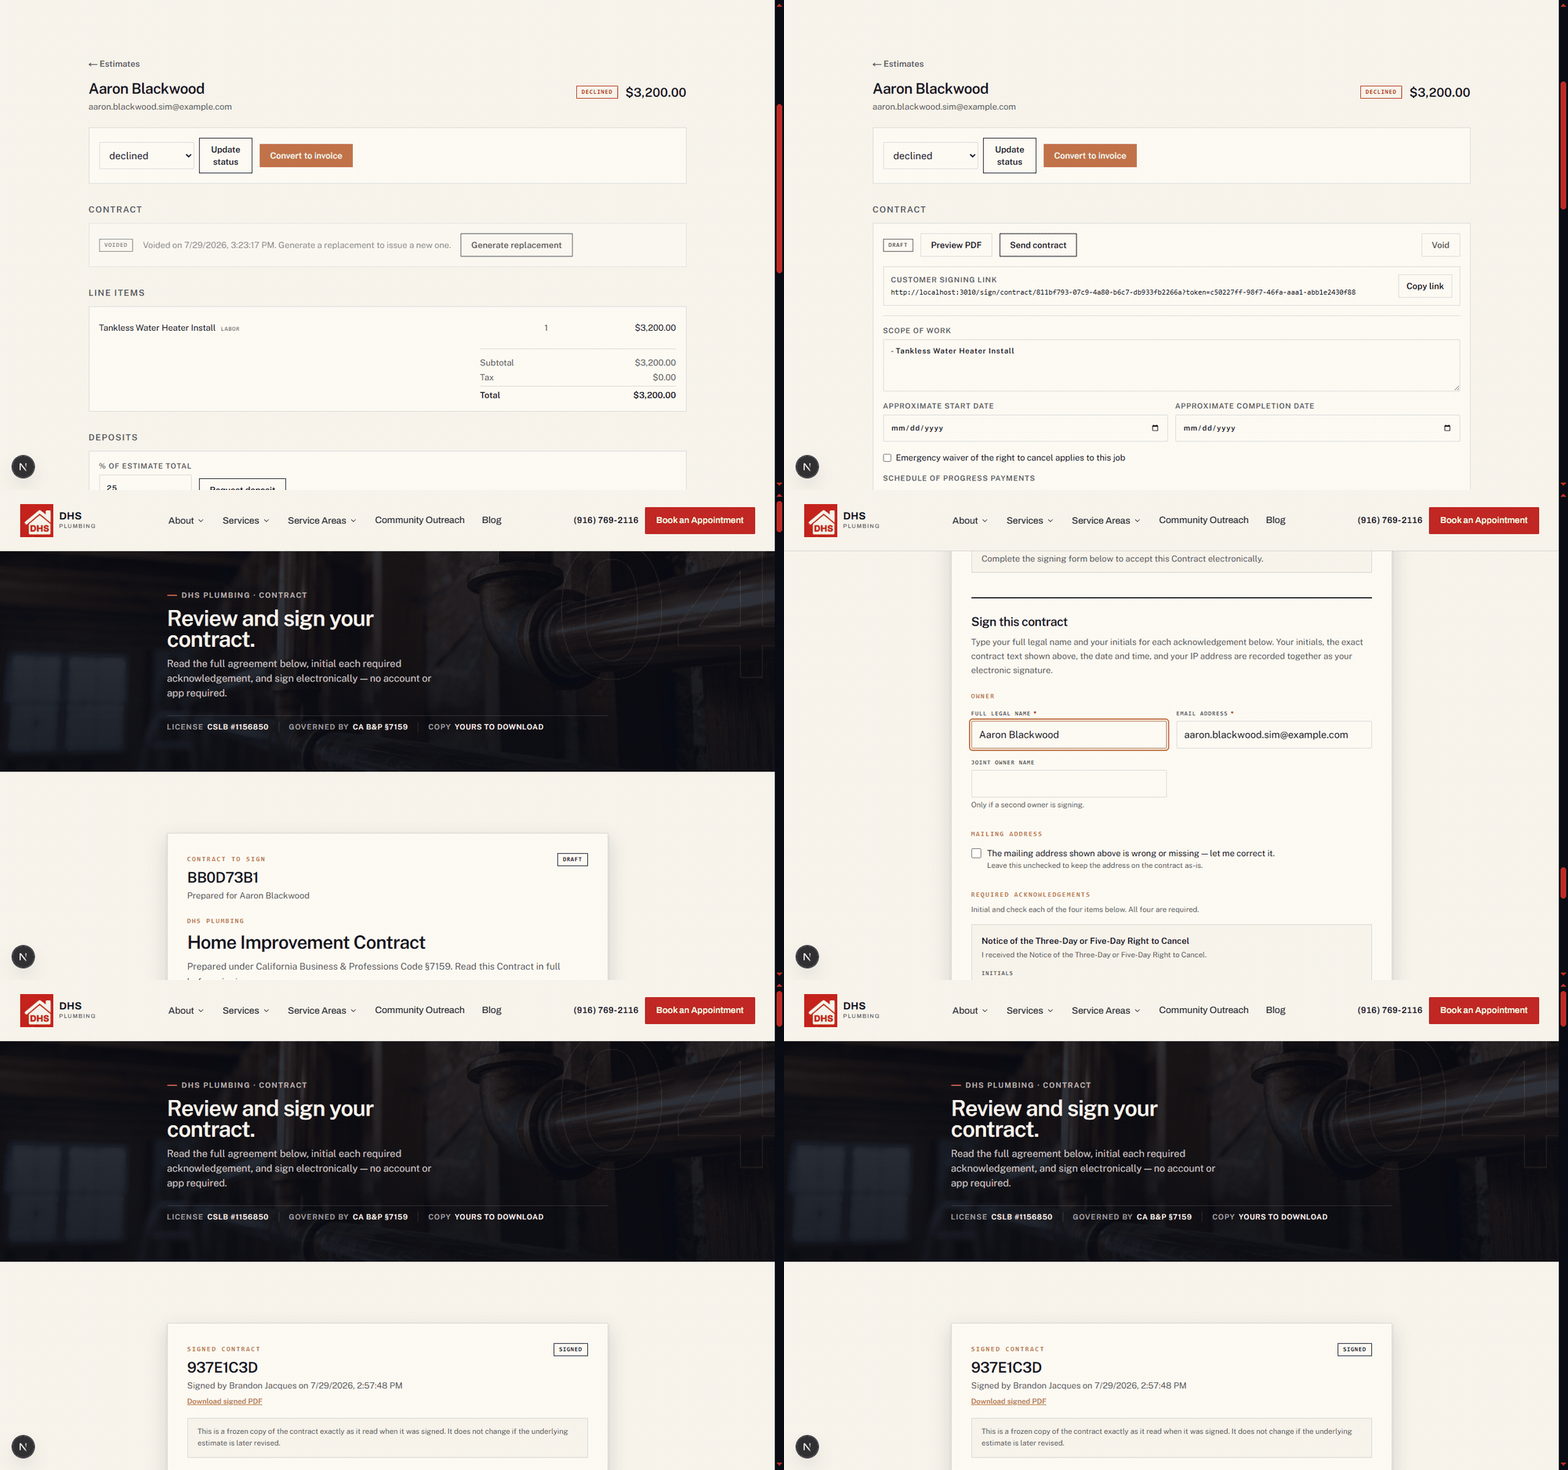
Open the estimate and the contract section shows one of five states: no contract yet, draft, sent, viewed, or signed.
If a contract was voided, you get a Voided notice and a Generate replacement button in place of Generate contract, so a corrected one can be issued without losing the record of the original.
-
Step two
Fill in the draft
Generate contract creates a draft and opens the editor right there on the estimate page.
This is where the scope of work goes, along with the approximate start and completion dates, and whether the emergency waiver of the right to cancel applies to this job.
-
The schedule of progress payments
Normally three rows: a down payment due at signing, a progress payment due when installation is complete, and a final payment due after inspection. Each row has its own description, its due-upon condition, and its dollar amount.
The scheduled total has to match the contract price. A running total sits right below the rows, so check it before saving.
-
Check it before it goes out
The draft shows the customer signing link directly on the page, with a Copy link button, and a live Preview PDF link that renders exactly what the customer will see.
-
Step three
Send it
Send contract emails that signing link to the customer and moves the status to sent.
Once they open it, the status advances to viewed on its own, before they have signed anything.
-
Step four
What the customer reads
Their page opens with the full legal contract above the signing form: the California Business and Professions Code section 7159 disclosures, the three or five day right to cancel, the mechanics lien warning, and all sixteen numbered terms and conditions, in full.
-
Step five
The signing form
It asks for their full legal name and email, a joint owner name if there is a second signer, and an option to correct the mailing address if it is wrong.
Then four acknowledgements, each with its own initials box and an I agree checkbox: the right to cancel notice, the payment and lien rights section, the mechanics lien warning, and the limited warranty. All four are required, plus a final electronic signature consent checkbox, before Sign this contract will go through.
-
The signed record
Once signed, the contract is frozen. Back on the estimate page, the admin view shows signed, the signer's name, the exact signing timestamp, the signer's IP address, and a content hash, with a note that this reflects the estimate exactly as it stood at that moment.
From here you can view the signed contract or download the signed PDF.
-
Voiding a signed contract
The frozen copy never changes. Voiding is possible if one needs reissuing, but it only makes room for a fresh replacement. It does not edit the old one.
Module 04
Invoicing
The invoices list and detail pages at /admin/invoices. Payment history, pay links,
and CSV exports.
Narration
Step notes
-
Step one
The invoices list
At
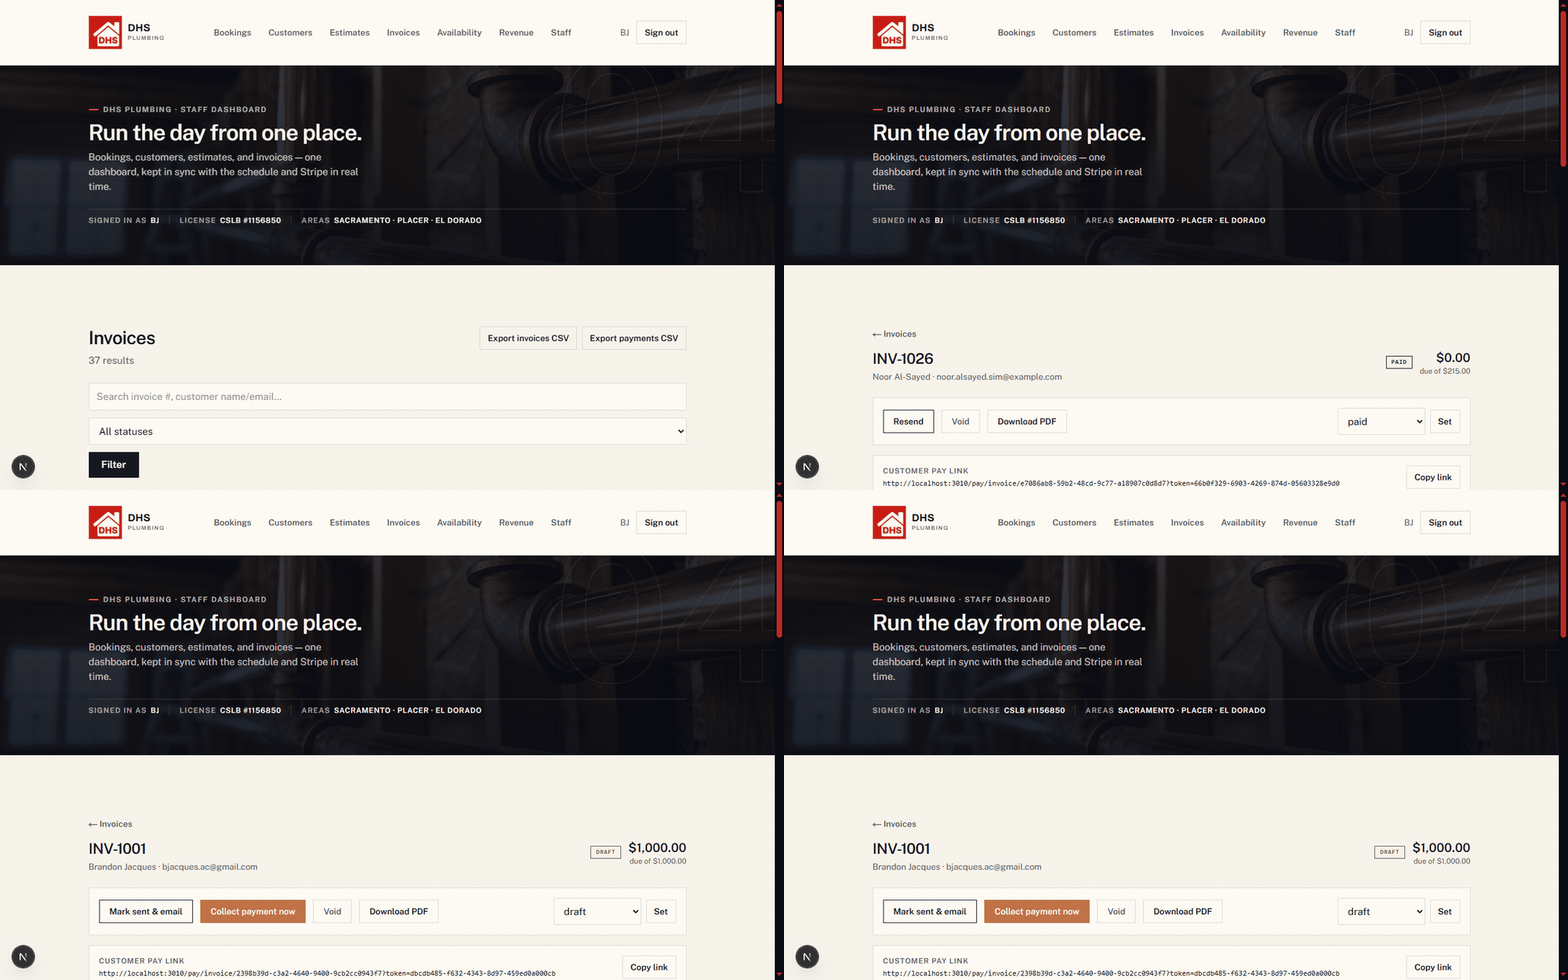
/admin/invoices. Status runs through draft, sent, viewed, partially paid, paid, overdue, voided, and refunded.Two export buttons at the top pull a CSV of all invoices or all payments, for accounting.
-
Step two
Create an invoice
Same shape as an estimate. Pick the customer, optionally link a booking, add line items with a service type, quantity, and unit price, set a due date and payment terms if you use them, then press Create invoice.
-
Step three
Open an invoice
The customer pay link sits right at the top with a Copy link button, alongside Resend, Void, and Download PDF.
Below that, the line items and the totals: subtotal, tax, total, paid so far, and amount due. A fully paid invoice shows amount due at zero.
-
Payment history
Every successful charge, its amount, the method, card or ACH, and the timestamp.
This is pulled directly from Stripe once a payment clears. Nothing in this list is entered by hand.
-
Deposits
They work the same as on an estimate: request a flat amount or a percent of the total, and it shows up in its own list once requested.
-
A deposit is not an invoice payment
The two are tracked separately. Converting an estimate to an invoice carries the total forward, but a deposit already collected against that estimate does not appear as an invoice payment. It has to be accounted for on the invoice.
-
The contract section here is read-only
The block at the bottom of an invoice shows whatever contract is on file for that invoice's estimate, the same summary card as the estimate page, with no editing controls.
Contract changes always happen from the estimate side.
Module 05
Admin
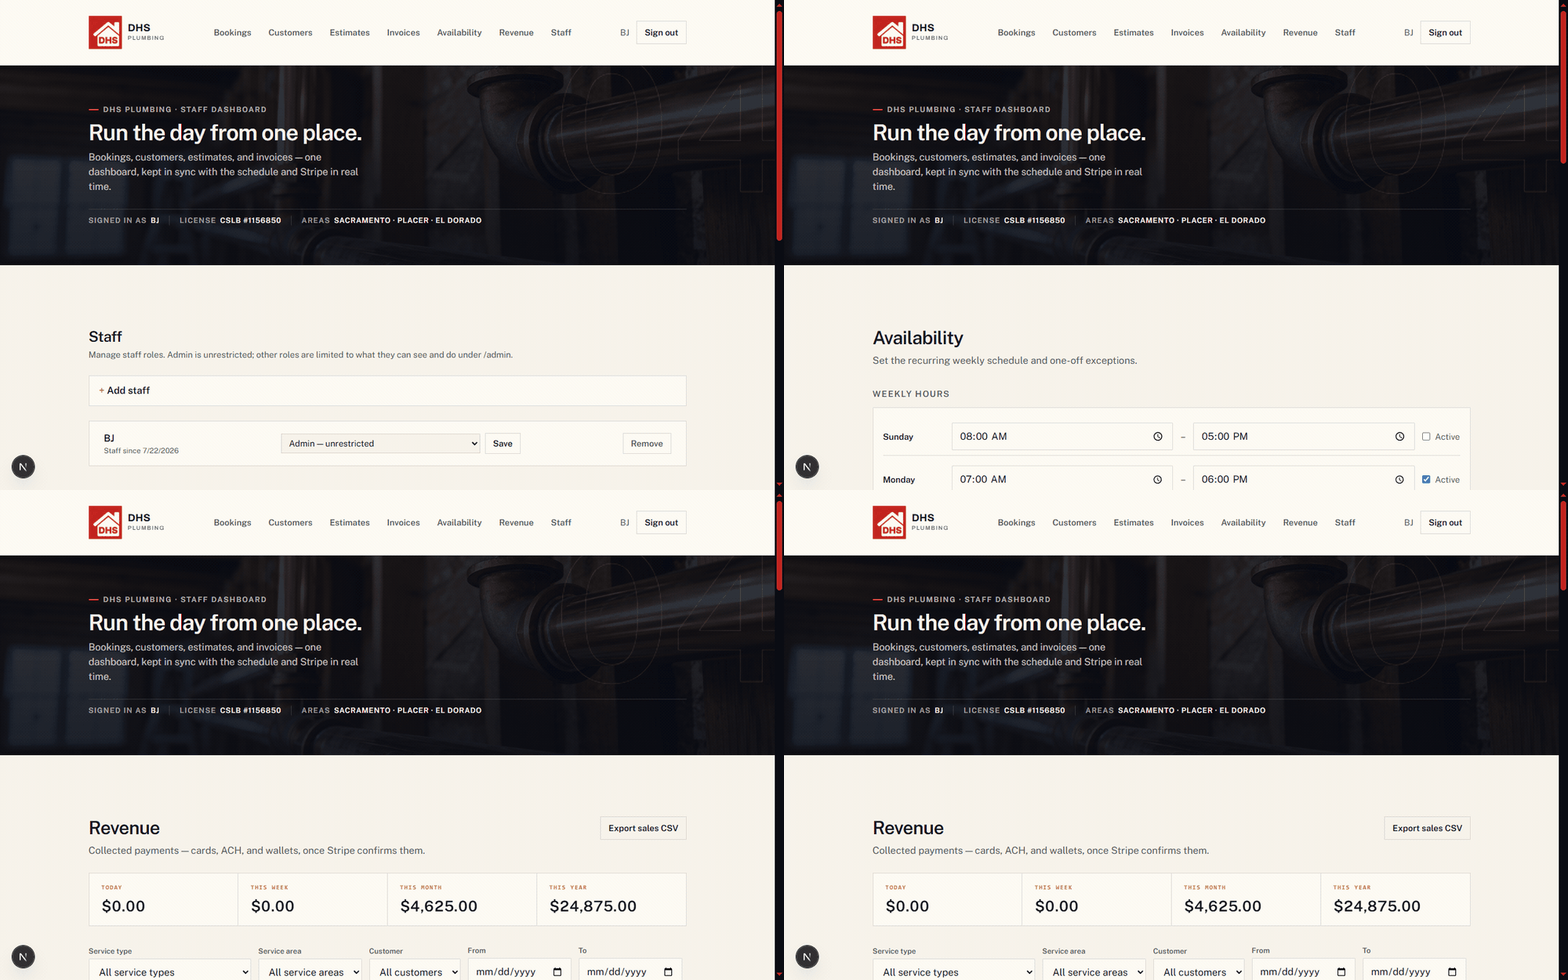
Staff roles, the booking schedule, and the revenue dashboard, at /admin/staff,
/admin/availability, and /admin/revenue.
Narration
Step notes
-
Step one
Staff and roles
/admin/stafflists everyone with a login and lets you set their role. Admin is unrestricted. Dispatcher covers scheduling and customers. Technician is view only, with no financials. Accountant covers invoices, payments, and exports.Pick a role and press Save. Add staff opens a form for a new login. Remove takes someone off the list entirely.
-
Step two
Weekly availability
/admin/availabilitysets the recurring weekly schedule customers see on the booking page: each day of the week, active or not, with hours. -
Date overrides
Under the weekly hours, for one-off exceptions. Leave start and end blank with Blocked checked to close the whole day. Fill them in with Blocked checked to close just that window. Leave Blocked unchecked to open an extra window outside the normal schedule instead.
-
Step three
Revenue
/admin/revenueis the money view. Four totals across the top: today, this week, this month, and this year.Below them, filters by service type, service area, and customer, new versus repeat, plus a date range and a search box.
-
Repeat customers and the sales log
A repeat customers table lists anyone with two or more paid orders, their order count, and their lifetime total.
Under it, every sale, one row per transaction, with date, customer, service type, service area, whether they were new or repeat, and the amount. Export sales CSV at the top pulls all of this to a spreadsheet.
-
What the revenue page counts
Collected payments only: card, ACH, or wallet, once Stripe confirms them.
A sent or partially paid invoice does not show up here until the money has actually cleared.
Internal use only. Screens captured against the live app; the customer shown is fake test data.